January 31, 2011

Starting Seedlings: What to Grow?

One of the biggest hassles of gardening (and also one of the most fun activities) is deciding what to grow and how much to grow of each plant. I can spend hours of dreary winter weather moving around all the hypothetical plants in my garden for the coming year, trying to make them all fit. If you are new to gardening you will probably want to start on the smaller scale and build up the size of your garden each year as you gain confidence and familiarity with each crop. Look through some seed catalogues and see what strikes your interest (and your appetite). Advice on obtaining your seeds will be covered in the next post in this series.

In order to decide what to grow, think about what vegetables you often buy at the grocery store or farmer's market. Assuming those crops can be grown in your area, you could try growing them yourself. If you love fresh salsa, but hate buying the overpriced store-bought stuff, put in a salsa garden (tomatoes, onions, peppers, cilantro). If you love fresh salads, put in a salad garden (lettuce, arugula, radish, carrot, onion). If you're a steak and potato kind of person, put in a root vegetable garden (potatoes, carrots, parsnips, rutabaga, beets, turnips, garlic). If you love fresh herbs, grow an herb garden (basil, cilantro, oregano, rosemary, chives). The important thing is to grow what you enjoy eating and what you think you'll actually be able to incorporate into your cooking. For example, I don't bother growing winter squash because I'm not a huge fan of eating them (so why waste the space?).

I grow lots and lots of tomatoes because I love fresh salsa and spaghetti sauce.

In terms of deciding how much to grow of any one crop...this is extremely difficult to determine. Trial and error is really the best way to figure this out. Personally, I tend to grow way more than I can eat. I know I will get as much as I could possibly want, plus I'll have enough to give away to friends and sell at the farmer's market.

Here's a rough idea of how to plan the crop quantities for your garden. For each person in your family, you may want a couple square feet of every salad crop, a couple tomato plants, a couple pepper plants, a hill of potatoes, one (or half of one) squash plant, etc. If you have a vegetarian in your family, bump up their quotas. Keep in mind that each gardening year is different. You may have a bumper crop of lettuce one year and a complete failure the next (but usually the extremes aren't quite this extreme).

I understand that it's easy to get overwhelmed (or carried away) with planning your garden. If you are new to gardening, here are some easy vegetables to start with that will most surely be a success:

Lettuce
Arugula
Radish
Tomato
Onion (from sets)
Summer Squash

Summer squash are very easy to grow. Shown here are pattypan squash (aka scallopini).


January 28, 2011

Photo Friday: Tomatoes in January

Lots and lots of Matt's Wild Cherry and Goldrush Currant

Goldrush Currant

Unripe tomatoes brought in for the first frost.

January 26, 2011

Homemade Beef Jerky

After making dried pineapple, the next thing I wanted to do with my new dehydrator was to make beef jerky. I remember making beef jerky as a kid with our infomercial food dehydrator. It took several days to dry, but was delicious.

Top round sliced and ready for jerky

I bought 3 pounds of top round for $5 a pound. The butcher sliced the meat for me into thin strips (no charge). I marinated the meat using the jerky spice mix that came with my dehydrator plus some Worcestershire sauce and temari (fancy soy sauce), but I skipped the jerky cure packets (containing salt and sodium nitrite). We never used a cure when I was a kid and it doesn't sound like an absolutely necessary step. I suppose if you were making ground meat jerky (with more germs and critters in the meat) and were intending to store the finished product unrefrigerated I might want to use a cure. We always refrigerated our jerky, so spoilage wasn't much of an issue.

Marinating jerky meat
After marinating for 12+ hours, I put the meat slices onto my dehydrator trays. I started the dehydrator before leaving for work and the jerky was done by the time I got home. In all honesty, I probably should have stopped the dehydrator a couple of hours earlier, but the jerky was fine.

Raw marinated beef in the dehydrator
My 3 pound top round dried down to only 19.4 ounces! That's a 60% reduction in weight.

For my next batch of jerky, I think I'll try my own spice and marinade mix. The pre-made spice mix was very noticeable on some pieces of jerky, but almost flavorless on other pieces. I should also try a different cut of meat to see if there is much of a difference.

Finished jerky

January 24, 2011

Coming Soon! Series on Starting Seedlings At Home

Even though it's only January (and snow is pouring down daily), it's time to start thinking about garden planning and seed starting. Over the course of the next few weeks I will be writing a series of posts on the topic of growing your own vegetable seedlings at home. Hopefully there will be some cute baby chicken posts thrown in the mix too!


Growing your own seedlings is easier than you might expect and opens up a world of possibilities. For example, hundreds of varieties of tomato seeds can be purchased through seed companies, while your local garden center may only offer a couple different options. Starting your own seedlings not only gives you more variety, but can also be much more affordable that purchasing flats of plants from the garden center. Most of the equipment and supplies can be found at your local hardware store for fairly cheap. A packet of seeds only costs a couple bucks! Why not give seed starting a try this year?


I will be covering the following topics (and maybe a few more as they come to mind):


What to Grow? How to plan your garden around what you like to eat and how many people you plan to feed. I will also list good 'beginner' vegetables that can help build confidence in new gardeners.

Obtaining Your Seeds Where to collect, trade, or purchase seeds for your garden.

Days to Maturity” Explained What exactly does the term "days to maturity (or harvest)" mean?

Transplanting Seedings versus Direct Sowing Which crops should be started indoors and which ones can be sown directly into the garden soil?

Equipment and Supplies A list of the basic supplies needed for seed starting.

Creating a Sowing Schedule Learn about your local frost dates and determine when to start your indoor seedlings

Sowing the Seeds and Germination How to plant your seeds and get them growing!

Environmental Conditions and Ongoing Care Other considerations when growing seedlings including temperature, fertilization, and watering.

January 21, 2011

Photo Friday: I'm addicted!

My current pile of library books. See any trends?
Some of the books I've been perusing lately include:

My seed stash as of January 2011.
My first seed purchase for the 2011 growing season.

January 20, 2011

Hand Dyed Fabric

My mom is and art quilter and has a huge fabric collection. For her October birthday, I asked her if there were any particular colors of fabric she was in need of. She said she could use green and turquoise. She thought I was going to buy her fabric from the craft store, but since I enjoy dying fabric and yarn, I decided to make her some hand-dyed pieces.

Turquoise and green hand dyed fabric for Mom's birthday.

Since the fabric was so much fun to make for her birthday, I decided to make some more for Christmas. This time she requested blues, purples, and “sky pieces” (for using as background fabric for landscape applique projects).

I have collected a lot of dye over the years and I have quite a few colors to choose from. I had a lot of fun mixing colors, dipping the fabrics in multiple colors, and splattering various dyes to make a variety of mottled fabrics.   

After dying the fabric, I let it set overnight
After sitting overnight, the excess dye is rinsed out before putting the fabric in the washing machine
Before washing, the fabric is very vibrant. Unfortunately, it loses some of its color in the wash. 
The fabric gets very wrinkled and frayed a lot in the washing machine, but it's fairly easy to iron and clean up.
A variety of blues and purples.


January 19, 2011

Pumpkin and Dark Chocolate Chip Cookies

I finally got around to using up some of the frozen pumpkin puree I made in the fall from my jarrahdale pumpkins. Pumpkin chocolate chip cookies are one of my favorite ways to use pumpkin puree (probably because it involves chocolate).

I have a feeling this recipe may vary wildly depending on the type of pumpkin you use (i.e. store-bought versus homemade, water content, amount of stringy pumpkin bits, etc). I've made it a few times and it's always slightly different, but always good too!

Pumpkin and dark chocolate chip cookies


*These are not your typical crunchy/chewy chocolate chip cookies, so don't expect them to turn out that way. These cookies are very dense and cake-like.

1 cup pumpkin puree (canned or homemade)
¾ cup sugar
½ cup vegetable oil (yes, this sounds kind of gross if you're not used to baking with oil, but this replaces the butter)
1 egg
2 cups flour
2 t baking powder
1 t cinnamon
½ t salt
1 t baking soda
1 t milk
1 cup semi sweet or dark chocolate chips (I think this is a little skimpy. I like to have a chocolate chip in every single bit, so feel free to add another ½ cup)
1 t vanilla

Preheat oven to 375ºF. Dissolve the baking soda in the milk in a small bowl. In a large mixing bowl, combine the pumpkin puree, sugar, oil, and egg. Add the flour, baking powder, cinnamon, salt and baking soda/milk mixture. Stir to combine. Add chocolate chips and vanilla. Spoon onto baking sheets.   Bake 10-12 minutes.

*I have found that an ice cream scoop works well for spooning out the cookies because this batter is extremely gummy and sticky.

*Although this may vary depending on the type of pumpkin you use, these cookies do not spread much when I make them, so you can put them fairly close together on the baking pan.

January 17, 2011

Garden Goals for 2011

I don't usually do New Year's resolutions, but I have recently decided on a few goals for my 2011 gardening year.

1) Eat more vegetables. I would especially like to try to eat more of the vegetables that I grow. I should try to incorporate veggies from my garden into every single meal this summer. I have a bad habit of growing random vegetables that interest me, but then I never actually get around to eating them! For example, I've grown swiss chard the last two years, but never eaten a single leaf. Swiss chard is beautiful enough to grow for its ornamental value, but I'm probably really missing out on some good stuff!

Swiss Chard: always beautiful, but what to do with it?

2) Keep better records. I usually keep track of the dates that I sow my seeds, but I never remember to record things like plant-out date (if transplanting), date of first harvest, or harvest yield. Generally, I remember things like flavor, disease susceptibility or resistance, and growth habit. Over the years, this knowledge can get a little jumbled and should probably be written down.

3) Plant fall crops. Every year I intend to sow a fall crop of carrots, lettuce, broccoli, cilantro, etc., but I always lose track of time or forget. It's a shame because I could plant all kinds of fall veggies in vacant spots that have opened up over the course of the summer. I also should try to build mini hoop-houses for season extension.

4) Grow strawberries. This will be a first for me.

5) Clean up my wild black raspberry patch and my red raspberry patch. These were engulfed by weeds last year and my harvest was almost nothing.


And finally...

6) Be a better composter. My goals are to chop up my compostables better (I've been meaning to purchase a machete just for this task), turn the pile fairly often (I never do this), and compost more cardboard, tissue, and paper (yes, these can be composted).

January 14, 2011

Photo Friday

I have two crates full of gourds in my basement just waiting for created projects. Any ideas?

January 12, 2011

Dehydrated Pineapple Battle: Canned versus Fresh (Part 2)

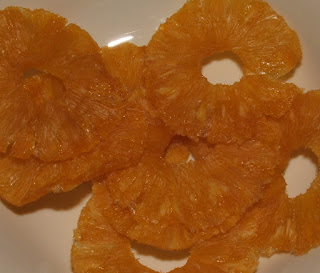
The fresh and canned pineapple I started to dehydrate a couple days ago didn't take long to dry. The fresh pineapple was done faster, but that's probably because I cut the pieces thinner than the canned stuff.

In terms of flavor, both the canned and fresh are very good. If I have to cast a definitive vote, I guess it would be for the fresh pineapple simply because the canned pineapple is almost too cloyingly sweet.

Dried fresh pineapple

Dried canned pineapple

It was pretty staggering how much the pineapple shrank in the dehydrator and how much water weight was lost. The fresh pineapple cost me $3 and dried down to only 5.6 ounces. The canned pineapple cost me $1.25 and dried down to 2.6 ounces. So in terms of value, the dried fresh pineapple cost 53.6 cents per ounce, while the dried canned pineapple cost 48.1 cents per ounce. Surprisingly, the canned pineapple was a better value. However, I bought the canned pineapple on sale. At regular price (about $1.50) the canned pineapple wouldn't have been the better value (at 57.7 cents per ounce).

P.S. I didn't weigh the dried mango, but it hardly amounted to anything! Making dried mango must be fairly expensive (but yummy).

January 10, 2011

Dehydrated Pineapple Battle: Canned versus Fresh (Part 1)

The first thing I wanted to make with my new food dehydrator was dried pineapple. I remember making this as a kid and it was very tasty. I was wondering if canned or fresh pineapple would be superior when dried (in terms of both value and flavor), so I'm putting them to the test.

The average 20 oz can of pineapple costs about $1 to $1.50 depending on the brand. The average fresh pineapple costs $3 to $4 depending on the season. After they are dehydrated I will do a taste test as well as compare the cost per dried ounce to see which is a better value. I'm also drying a mango just to see how it works out.

Mango, canned pineapple, fresh pineapple

One can of pineapple contains 10 rings
One fresh pineapple sliced into thin strips
Fresh and canned pineapple in my food dehydrator


January 7, 2011

Diagram Friday: Garden Square Footage


Layout of my 2011 vegetable garden

We recently had a warm spell here in Michigan. Temperatures around New Year's eve and New Year's Day got up to almost 55F! I took advantage of the warm weather to take some measurements of my garden and work on my chicken run a bit. Several people have asked me recently how many square feet of garden space I have. I never know what to say, partially because it increases every year.

After measuring all my beds, I calculated a grand total of approximately 706 square feet. This does not include my cut flower garden (the oval shaped bed in the diagram), which I might convert over to vegetables this year (cut flowers were NOT popular at the farmer's market last year).

706 square feet sounds like a lot of garden space, but that's tiny considering my yard is .71 acres (30,927 square feet)! That means I only have .023% of my yard in cultivation. I guess I need to get plowing this year and bump up my percentage a bit!

January 6, 2011

Farmer's Market Decision Making

With the new year in way, it's time to start planning my 2011 market garden. But before I do that, I need to decide what farmer's market(s) I'm going to sell at this year and decide if I need to scale up or scale down. 2010 was my first season as a market gardener. I learned a lot about planning ahead, harvesting, what customers tend to buy, what they shy away from, and customer habits.

Last year I sold exclusively at one particular market. This market was relatively new (in it's second season) and was in a lower income area.  Due to a combination of poor weather, overall low attendance, and lack of food-educated customers, my first market season was somewhat discouraging. If I continue at this market in 2011, it will be on a limited scale (only a few weekends over the course of the summer).

I've been looking at other options for selling my produce from the Green Zebra Market Garden. My options are:

1) Switch to a different market
2) Alternate between more than one market over the summer
3) Start my own CSA (community supported agriculture)
4) Bail out of the market gardener's game and grow vegetables entirely for my own pleasure

Option #1: Due to my commitments with graduate school, I'm am restricted to farmer's markets that are on Saturdays or Sundays. There are only two markets in my area that fit that schedule (one being the market I did last year). The second market is slightly farther away from me, but may have a larger customer base.

Option #2: I may lose customers loyalty if I'm not at the same market every weekend (not that I had any loyal customers), but maybe a two-market system will help balance out my gains and losses.

Washing mizuna for the farmer's market

Option #3: I would love to do my own CSA, but I'm not sure if my garden is large enough to support a CSA. I could offer only a limited number of shares, but even this might be tough. Growing enough food to fill just one CSA share each week would require me to have 4-6 different crops ready each week throughout the entire summer. I know from experience that some weeks there is plenty to offer, but other weeks there's almost nothing. As an aside, I could include fresh eggs in my farm shares starting in June or July (assuming there aren't any legal issues).

Another advantage of a CSA system is that there are no rainy market days. The worst part about doing a farmer's market is spending all the time and effort harvesting, washing, and packing up produce only to have it rain on market day. Generally sales are down and you end up bringing most of the produce back home with you. What am I supposed to do with 30 heads of unsold lettuce? Donating excess produce to a food pantry is always an option (and I have done this), but doesn't help me support my gardening passion (addiction?).

So much lettuce and no one to buy it...

Option #4: Participating in the farmer's market was a lot of fun last year. I got to do a ton of gardening and had a blast talking with customers about growing food, recipes, and community news. However, planning and running a market garden is stressful. You don't know for sure if crops will fail, if your vegetables will ripen on time, if it's going to thunderstorm on market day, if any customers are going to show up, etc.  I don't depend on the market garden for my personal income, so is it worth the time, effort and stress?

In another example: I love growing heirloom tomatoes. However, the customers at my farmer's market don' like buying them! Many of my customers have never seen a non-red tomato before. The customers in my area tend to buy the usual bright red hybridized beefsteak tomatoes (you know, the ones that look exactly like the ones at Walmart). Anything unusual in color or shape doesn't tend to sell very well. Should I cater to customer preference and stop growing the kinds of plants that I love?

Gardening for personal pleasure is a lot less stressful  because you can grow exactly what you want. Also, if your crop isn't ripe by a specific day, no big deal...you eat it later when it's ready.

There are pros and cons to all four options. Luckily I don't have to decide immediately. Any wisdom or advice out there?

I put in an entire cut flower garden in 2010, but bouquets were a flop at the farmer's market!

Unschooled

January 4, 2011

Clearance Amaryllis

I picked up two Amaryllis bulbs while after-Christmas shopping. One bulb is 'Minerva' and the other is 'Appleblossom'. I haven't grown an Amaryllis in probably 10-15 years, so hopefully I'll be successful. If I remember correctly, they initially grow and flower just fine, but keeping them alive afterwards (or getting them to re-flower) can be tricky.

Any suggestions on getting these to re-bloom?

Amaryllis Appleblossom (L) and Minerva (R)

The roots on the Appleblossom bulb are much more plump and healthy looking than the Minerva bulb. It will be interesting to see how they perform.
Related Posts Plugin for WordPress, Blogger...