November 29, 2010

Making Pumpkin Puree

I got a fun new kitchen toy for my birthday this year!


This happens to be a food strainer, specifically a Roma Food Strainer and Sauce Maker. This type of gadget is often referred to as a Squeezo (although that is technically the brand name for a particular, and very very expensive, food strainer). Squeezos can be used to make spaghetti sauce, salsa, mashed potatoes, vegetable or fruit purees, jams, and juices. Since I do a lot of canning, a Squeezo is very handy.

Today I made pumpkin puree from one of my jarrahdale pumpkins. Over the course of about 24 hours, this particular pumpkin started to go soft and mushy, so I cooked it up as soon as possible.
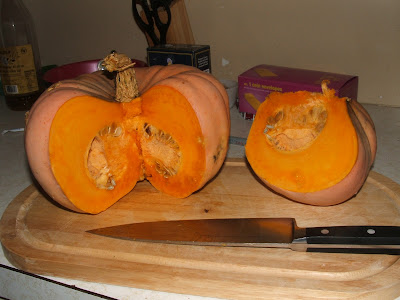
My green jarrahdale pumpkin turned orange. Time to make puree!

I removed the seeds and stem from the pumpkin, but left the stringy pumpkin guts and skin intact. After chopping into large chunks, the pumpkin was boiled until very soft. I strained and cooled the pumpkin slightly (part of my Squeezo are made from plastic, so I don't want them to melt). Then the pumpkin chunks went into the Squeezo. I was pleasantly surprised at how quickly and easily the process went. The strainer removes all the skins and stringy bits from the pumpkin and send them out a separate chute.

Boiling pumpkin
Food strainer at work (the skins and waste comes out the chute on the left hand side of the photo).

Overall, one jarrahdale pumpkin produced almost exactly 4 pounds of puree. I froze the puree in 2 cup (1 pound) portions. I have three more of these pumpkins, so eventually I'll have 16 pounds of puree! I look forward to making a variety of pumpkin-laden baked goods and maybe some pumpkin soup.

Left: pumpkin puree; Right: pumpkin waste

One of my favorite recipes is pumpkin chocolate chip cookies. They are very moist and cakey. These cookies are especially good when made with dark chocolate chips and lots of cinnamon. More on these cookies in the future.

P.S. The standard screen that comes with the machine is supposed to be for applesauce and tomatoes, but it worked just fine for pumpkin. You can purchase extra screens designed for pumpkin, berries, salsa, and grape juice. I have a feeling that the standard screen will work for just about all of these (with the exception of grape juice of course). I'll find out next year if the standard screen is small enough to remove berry seeds.


November 27, 2010

Orange jarrahdale pumpkin?


Does anyone know why my one of my jarrahdale pumpkins is turning orange? The obvious answer is that it is ripening, but I was under the impression that these pumpkins were supposed to be green when ripe.


A couple months ago, I brought in the four jarrahdale pumpkins that my garden produced this year. They have served as a nice fall decoration and I love the gray-green color of their skin and their deeply ribbed rind. This was the first year I grew this variety of pumpkin and I'll definitely be adding it to my list again for 2011. My harvest was a little disappointing though. I planted at least six plants (I don't keep very good records), but only got four fruit. 


I've read that these pumpkins can store for a year or more if the conditions are right. Mine have kept very well the last couple months inside, but I will probably turn them into pumpkin puree fairly soon (I'll start with the orange one).

Pumpkin Jarrahdale Heirloom Seeds 7 Seeds
Get Jarrahdale pumpkin seeds here!


November 25, 2010

Pitiful Parsnip Harvest


My garden has been frosting over nightly, so I figured it was about time to harvest my parsnips. Parsnips should be harvested after the first frost for the sweetest roots. 

I was very disappointed with my crop! I planted an entire packet of seeds this past spring and I only got four roots (and three of them are tiny)! At least I can look forward to a single serving of delicious roasted parsnips in the near future.

Any hints on growing parsnips?

All American Heirloom Parsnip Seeds 100 Seeds
Get parsnip seeds here!

November 23, 2010

Packing up my rain barrel

Rain barrel attached to the downspout of my house.
I made a rain barrel (or cistern) for my house this spring at a Master Gardener workshop. They advised that we take them apart and store them over the winter. I haven't needed to water anything in weeks, so I guess the rain barrel is done serving its purpose for the year. I wasn’t completely sure what to do with all of the water that was currently in the barrel (approximately 50 gallons). I connected my garden hose to the spigot on the rain barrel and released the water into the yard. I took over 30 minutes to drain because the water is not under pressure. I packed all the parts away for the winter and reattached the section of downspout that I had removed last spring to install the barrel.

I’m hoping to get more use out of the rain barrel next season. It was really handy in early spring when I had just a few seedlings to water. Waiting a couple minutes for gravity to fill up my watering can took a short amount of time. But once the season got into full tilt, I couldn’t take the time to fill bucket after bucket from the rain barrel. Once I reverted over to the more time-efficient hose and spigot, I kind of forgot about the rain barrel for the rest of the season. I’ll try to do better next year.

P.S. I’ll be adding a dedicated post about rain barrels in the future sometime.

November 21, 2010

Garage chicken coop

My house has a decent sized detached 2-car garage. When I bought the house, my building inspector was suspicious of the stability of the garage and advised that I have it torn down. However, a friend of mine, who happens to be a contractor, deemed my garage to be structurally sound. That said, I still don’t park my car in it. After years of apartment living, I’m used to parking outside…and having my doors freeze shut…and scraping ice off the windshield...and scraping ice off the inside of the windshield! For the last year, my garage has held nothing else but my snow blower (one of the best $300 I ever spent) and the old windows from my living room. 

Now the eastern section of the garage is going to become a chicken coop! The garage coop will be protected from weather and predators (hopefully) and has greatly reduced my chicken coop expenditures (because it is an existing structure). It also has electricity for running a lamp to adjust photoperiod, or a heat lamp when brooding chicks.
Chicken coop area (under construction) in my garage.
I have the cordoned off a section of the garage I with poultry netting. The garage has a large window on the east side with 18 panes of glass. I intend to remove one of the panes to create a chicken door, or pop-hole, that will connect the coop with the run. I still need to finish installing perches and nest boxes as well as build a couple ramps for the chicken door.
Nice bright windows in my garage.

November 19, 2010

Chicken Run

Fencing around my chicken run.
I had some extra time yesterday so I worked on one of my ongoing projects in the backyard. Over the last few weeks I’ve been slowing building a chicken run on the side of my detached garage. I won’t be getting chickens until at least February of next year, but I wanted to get a head start on getting their housing ready. It is going to be unbearably cold for the next 4 months, which doesn’t facilitate working outside. Furthermore, I would have to wait until at least March or April to dig post holes again without the issue of permafrost.

A few weekends ago I dug the post holes and installed the fence posts. Last weekend I put up the fencing (6 foot high welded wire; one of my favorite outdoor materials). Today I installed a layer of chicken wire near the base of the fence with a 1 foot skirt along the outside (to discourage digging predators). I plan to cover the chicken run with poultry netting to prevent hawks and the more determined climbers from getting in. I’m curious if the netting will accumulate snow and ice over the winter. This is yet another reason I’m getting the chicken run ready now…to see if it will survive a Michigan winter without collapsing on its occupants (or providing them with an easy escape route).

November 18, 2010

Garlic is Growing!

I planted several heads of grocery store garlic a few weeks ago. It already started peeking through the mulch and has grown quite a bit during the warm-spell we had the last couple weeks. Hopefully this growth spurt isn't going to compromise their winter survival (I'm pretty sure this happened last year too and it grew just fine). 

Fall-planted garlic on Nov 14

This fall and last fall I planted grocery store garlic.  It did great last year! I was surprised because most of the garlic at the grocery store is from California, but it did just fine in Michigan.

Garlic for sale at my 2010 farmer's market stand. These heads were grown from grocery store garlic cloves!


November 17, 2010

I'm Getting Chickens!

I recently decided (definitively) that I am going to get chickens this spring. I’ve wanted chickens for over a year, but I have been hesitating for a number of reasons. 

Firstly, I wasn’t sure if I wanted any more hobbies to distract me from gardening. 

Secondly, it was unclear for quite some time if it was legal in my municipality to own chickens within the city limits. As it stands now, people can legally raise chickens in the city, but this could change in the future. Our local municipal code does not specifically outlaw the keeping of chickens. However, I was informed by a city clerk that anything not specifically mentioned in the municode is illegal (doesn’t make much sense to me). After much confusion, I eventually found out that our city defers to a new county ordinance on backyard poultry. City residents may only keep 5 chickens, none of which can be roosters. The birds have to be confined (not loose and terrorizing the neighborhood) and the housing of the chickens has to be 10 feet from any property line and 40 feet from any dwelling. It also mentions some common sense stuff about food storage and vermin prevention. It also says you can't slaughter your chickens (although I'm not sure how the city would keep tabs on that). I guess meat birds are out of the question.

Since I’ve consistently wanted chickens for a whole year now, I decided that I’m finally going to do it. I will be getting 5 laying hens of different breeds (that will lay brown and blue eggs). If all goes as planned I hope to pick up my chicks at a local hatchery sometime in February.
My partially finished outdoor chicken run.

November 16, 2010

Helleborus foetidus

Helleborus foetidus
The Helleborus foetidus in my front yard is getting close to flowering!  This plant was salvaged from the yard of one of my professors (who was undergoing a major garden renovation). If it behaves like it did last year, it will flower again in very early spring.  I generally like plants with green flowers, they aren't as showy as plants with bright pink or red flowers, but they are still very beautiful.

November 15, 2010

Packing up for the year

I'm slowly working on cleaning up my fall garden.

With freezing night temperatures becoming an almost nightly occurrence, it is about time I tear out my withered plants, bring in my hose, emptied the rain barrel, and stash away the garden tools. I am very guilty of leaving tools and supplies out in the elements all summer long. My pruners and shovels are completely rusted and some of the pots I left on the deck have left watermarks.

I have been putting off the task of removing my tomato cages from their withered occupants for a couple weeks now, but I finally got around to doing this over the weekend. This task is always a pain. It takes a while to remove all the plastic plant ties and un-weave the plants from their metal frames. I added eight more cages this year, so I had double duty this fall!

Tomato plants in my homemade cages (after several frosts).
I hear that it is best to put dead tomato plants in the garbage rather than adding them to the compost pile, but I’m not willing to pay to have them hauled away. I’ve been composting my tomato plants for years and have never had a major disease problem. The plants are fairly tough and woody by the end of the summer, so they go into my “slow” compost pile (with leaves, twigs, and other woody herbaceous material) rather than into my “fast” compost pile (mostly kitchen waste, herbaceous weeds, and grass clippings).

November 14, 2010

Introduction (part 3)

I've lived my whole life in Michigan. I dream of warmer climates and will most likely leave the state to find work at some point. I can't wait to change hardiness zones and be able to grow a broader range of plants. Gardeners in my growing zone, 5b, are somewhat limited in terms of what they can grow successfully, yet there are plenty of options. Michigan winters are fairly harsh and many crop and ornamental plants cannot survive year round. The seasonal nature of gardening in Michigan can be frustrating for me sometimes. The winter months of November through March are almost completely devoid of outdoor gardening opportunities. However, I keep busy by planning next year's garden, collecting and perusing seeds catalogues, organizing my seed collection, and starting seedlings in my basement, to name a few examples.


November 12, 2010

Introduction (part 2)

The first garden that I called my own (constructed, planted, tended, and harvested by yours truly) occurred when I was about 13 years old. When I look back at that first garden, I realize that it was basically a sandbox in full shade. I didn't know much about gardening at that point in time. The plot was completely planted with hybrid tomatoes. I didn't even like tomatoes at the time, so I'm not sure why that's what I chose to grow. I think my parents had a bit to do with the decision since they were the ones who shelled out the cash for my seedlings. It took 10 more years and my first sampling of heirloom tomatoes to change my mind...and over 10 years later, it's still the plant that dominates my garden space.

A variety of heirloom tomatoes from my 2011 garden.


Links: 

November 11, 2010

Introduction

Today marks the date of my 25th birthday. I figure this is as good a day as any to finally get this thing started.


Welcome to the Green Zebra Market Garden Blog. Green Zebra is the name of my produce stand at the local farmer's market and is also the name of a interesting and gorgeous heirloom tomato. My goal is for this blog to be a place to document and share some of my experiences with gardening, cooking, crafting, photography, and other areas of interest.

First, you should know a little bit about me. I am a graduate student pursuing a PhD in greenhouse floriculture. I started my third year of school this fall (I am in a five year program) and I am enjoying myself thoroughly. The basis of my research is to determine the best practices for growing bedding plants and potted plants in greenhouses. Specifically, my dissertation will focus on the use of light emitting diodes (LEDs) as an alternative light source for greenhouse crop production (but more on that later). You may not know this, but horticulture is pretty big business in the state of Michigan. Michigan ranked third in floriculture production behind California and Florida in 2009 (with a wholesale value of $397.4 million).

I've been gardening as long as I can remember. I have memories of digging furrows and planting seeds with my Mom when I was very young. I also remember finding grubs in the soil and being completely disgusted that our food was growing in the same place. I guess I got over it.  
Related Posts Plugin for WordPress, Blogger...